After a particularly nasty day at work, I decided that I needed to unwind in a more "constructive" way. Yes, it was time to finally get that blown engine out of my longterm project Jetta.
Tuesday, May 20, 2008
. . . about stinkin' time!
After a particularly nasty day at work, I decided that I needed to unwind in a more "constructive" way. Yes, it was time to finally get that blown engine out of my longterm project Jetta.
Sunday, May 18, 2008
Saturday is the most glorious day!
As long as I can recall, Saturday has been reserved for manic garage-antics and epic trips to the junkyard. When I was a kid, Saturday was always the day that my father tore into those long neglected repair jobs. When the Volare limped home on four cylinders one Wednesday in the summer of '91, the next Saturday my father dragged me off to a shady salvage yard in Claremont, NH to pick out a "gently-used" slant-six for transplant. Then, using a come-along and a stout maple in the back yard for a hoist, the surgery was completed and the Volare, with its new - err, gently-used powerplant- roared (read as puttered) back to life. I can't tell you how much this impressed me. I remember thinking that my father was a mechanical genius and that this back-yard engine swap was the work of a true master. After all, any surgeon (with access to the latest in high-tech medical equipment) can replace a bad heart but only my dad could swing a 400-pound engine out of its bay using a tree limb and some chain.
It's some seventeen years later and now I am the dad with the weekend to-do list. Projects on tap for this glorious Saturday are a starter motor removal and replacement on a '90 Jetta with a slush-box transmission and door handle repair on a '94 Saturn SL1.
First up: Starter Motor R and R
Thursday, the white Jetta presented with a no start condition. When the key was turned the click of the solenoid could be heard but the starter failed to engage. I conducted a few tests and made a determination that the starter was kaput. First, I tested the main ground which runs from the negative battery terminal to the transmission. Conducting this test and the other tests to follow requires a multimeter. A suitable and cheap meter can be acquired from a local Radio Shack, Sears or generic auto parts store. I bought my cheap meter six years ago for $20 and it still works fine.
Okay, now that you have a multi-meter you probably feel all cool and tech-savvy. What follows is a narrative regarding the diagnosis and replacement of failed ignition and starter circuit components. It is not a "how-to" or a repair guide by any measure. It is simply a written documentation of my experience. I make no guarantee- implied or otherwise - regarding the trouble-shooting and repair technique detailed below and I am not responsible for any harm that might come to you, your car, your mother-in-law, your pet lama or anyone or thing that may be destroyed or maimed as a result of your own actions. By the way, this is a standing disclaimer that applies to everything written in this blog. That said, read on and enjoy.
So, with cheap meter in hand turn the selector to measure circuit resistance - also known as continuity. The units used to measure resistance are called ohms and they are annotated with this symbol: Ω. (Oh, by the way, resistance is the measurement of how much a conductor hinders the flow of electrons. The higher the reading the more a given material or circuit hinders the flow of electrical current. If the resistance is infinite then there is a break in the circuit.)
To test the ground place one of the meter's leads on the bolt that locks down the battery ground and put the other lead to a bare bit of metal on the engine. The ground is good and so the meter reads zero ohms of resistance. Any other reading on the meter means that there is too much resistance in the circuit. A poor main ground can cause a no start or hard start condition - especially when the temperatures start to drop. Usually a good cleaning of the battery terminals and the contact patch around and beneath the ground bolt on the transmission will remedy this condition. There are some who replace the main ground wire with a heavier gauge, however, I have never found this necessary. Note: to properly clean these contacts the battery terminals have to be detached and the ground bolt has to be removed. A bit of sand paper or a wire brush can be used to scrape away the corrosion that lurks in these trouble spots.
So, that didn't fix the problem. Well, time to move on to the next test. This test will determine if enough power is being delivered to the starter and solenoid. This is a two part test. I'll also need a buddy to help me with part of this test. First part - this is the part that requires the buddy - is to check the voltage being delivered to the solenoid switch.
The solenoid switch rides piggy-back on the starter. The solenoid is essentially a relay that uses a small-current voltage routed via the ignition switch to control a larger-current that is routed to the solenoid directly from the battery. Inside the solenoid is a coil of wire looped around a conductive plunger. When the ignition switch is turned to the 'start' position, voltage surges into the coil creating a magnetic field that draws the plunger into the center of the coil, which completes the circuit between the battery and the starter motor, which causes the engine to turn over and to fire-up, which allows you to drive to the store to buy chocolate ice cream and strawberries for your pregnant wife which, ultimately, keeps the peace in your household. If there is a break in either solenoid or starter circuit the engine will not start and the world will end - well, sort off.
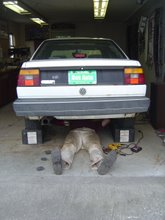
Okay, that said, disconnect the wire that runs from the firewall to the solenoid. It is easy to identify because it is the smaller of the two wires that connect to the starter and it is the only wire attached to the solenoid via a quick-disconnect terminal. Place one lead on the disconnected wire and the other lead to a grounded spot of the chassis. Turn the selector to measure volts. Have your buddy - I used my brother (he wasn't doing anything important at time - well, he was swapping in tinted taillights on his '97 Jetta - at least he wasn't swapping in clear taillights like those Honda boys.) Have your buddy turn the key to the start position. The meter should read 12 volts. According to the Bentley service manual the minimum acceptable reading is 8 volts. Any reading less than this indicates a problem with the ignition switch or the wire that runs between the ignition and the solenoid. Look directly below for a photo of me replacing the wire that runs from the ignition to the solenoid. In the photo, I am crimping a new quick-disconnect terminal. The terminal will then be slipped into the plastic terminal block that plugs into the ignition switch. Always use automotive grade wire of the appropriate gauge. No, that lamp cord in the attic will not suffice.

If no problem can be found here, the next step is to test the power from the battery to the solenoid. This is the larger wire that runs from the positive battery terminal to the bolted-down ring terminal on the solenoid. Conduct this test in the same manner as the last except this test can be done with the key in any position - which is good because your buddy must get back to his taillights. Here again, a reading of 12 volts is ideal but - according to the Bentley service manual - 8 volts is the minimum acceptable reading.
If both these tests yield positive results, then either the starter or the solenoid have given up the ghost. The solenoid can be tested by bridging the two threaded posts with a jumper. The top post is the one that has the bolted-down power wire from the battery and the bottom post has a bolted-down field winding that relays power to the starter motor. - WARNING - Make sure the car is in neutral or Park before conducting this test. You may be my only reader and I can't afford to loose you. The two terminals can be bridged with a piece of 10 gauge wire or - if nothing else is available - the power cable can be loosened from the top terminal and touched to the bottom post. Take care to hold on to the wire insulation or you may get fried. - This is a good point to remind you that I am not responsible for your early demise. If you get yourself killed or maimed it is your own damn fault. Though, I will be a little sad, not because I miss you rather because you'll have left my Blog readerless - If there is a pop and a spark followed by the whir of the starter motor then it can be concluded that the solenoid is shot. If nothing happens or if there is a spark but the starter does not engage, then most likely it is the starter is faulty.
In the old days, people used to either re-build the starter or solenoid on there own or have a local, specialty shop complete the task. These specialty shops are still out there. I can think of two in my area, however, the more common practice is to call a franchise parts place and order a new (read as more expensive yet reliable) or a rebuilt (slightly cheaper but of questionable quality) starter/solenoid assembly. For a VW figure on a price of about $180 for the new one and about $150 for the rebuilt. If you don't have the bread for the whole assembly but you've determined that only the solenoid is dead, then there is a cheaper - albeit - ghetto style fix. Simply purchase a Ford starter solenoid and a small spool of 10 gauge wire and bypass the starter-mounted solenoid altogether. The Ford switch can be salvaged from a pre-86 Ford van or truck at the local auto bone yard or an equivalent can be purchased at any parts store for about $10. One particular model is the Duralast F496 Starter Solenoid. You can figure out the wiring on your own.
Back to my project. Removing and replacing the starter is a fairly straight forward task - unless - like me - you own a Jetta equipped with an automatic transmission. To remove the starter on such a Jetta the passenger-side axle must be removed to gain access to the starter motor. A special tool is required to remove the six bolts that fasten the axle to the transaxle flange. On the other end, a 30mm nut secures the axle to the hub. If you lack pneumatics a rugged breaker bar will do the job. However, do not attempt to break this nut with the car jacked or on stands as the torque required is enough to topple the vehicle from its perch.
To prevent these problems, the engineers at Volkswagen designed a heat shield to divert heat off the starter and solenoid. The heatshield - which is positioned directly between the starter and manifold - is made from pressed aluminum. Unfortunately, after eighteen winters the heatshield on my Jetta acquired some amoeba-shaped rust holes.

The remedy, of course, is to wrap the starter in a heat-reflecting blanket. Most auto performance retailers stock these fiberglass wraps. Unlike the blanket on your bed, this one is designed to keep the starter cool - not warm - by shedding 90 percent of the ambient heat that would otherwise be absorbed by the starter. After wrapping the starter in the heat-reflecting blanket, all that remains is installation and reassembly - this of course - is the reverse of removal. When you're done, have a beer or six to celebrate.
Next up: door handle repair
Broken door-handle assemblies are a snap to replace on a older Volkswagen because there are only two bolts holding the mechanism to the door. Replacing a broken door-handle assembly on a Saturn is entirely different. Check out the photos below and you'll see that the plastic door skin and mirror must be removed to gain access to the door mechanism.
 First, the handle must be removed. This is accomplished by removing the plastic pins that hold the handle. Press out the center of the two-part pins and then pry the outer piece from its housing. With both pins completely removed, the handle should pop-off when pressed to the left.

Next, remove the mirror. Three bolts secure the mirror to the door. To get to these bolts, a plastic piece of interior trim will have to be pulled back and out of the way. Only one screw holds this triangular piece of trim to back side of the mirror.

With the mirror detached, work from the inside of the door. Using a T30 torx bit, loosen and remove the nine screws that fasten the door skin to the door. With a little finesse, the panel should now come free. Using two sets of needle-nose pliers, disconnect the door-handle linkage and, then, gently pry back the tabs that secure the handle-mechanism to the door frame. Instal the new door handle mechanism. A small hammer may be used to tap the tabs back into position. Otherwise, instalation is the reverse of removal.

 Note the missing spring on the handle assembly above. Look below to see a properly-working example.

You've got to love the Saturn's rust-proof polymer panels. BMW made a polymer-clad roadster back in the early '90s. It was called the z-1 and it was a lot faster than my Saturn, pricier too.


It's some seventeen years later and now I am the dad with the weekend to-do list. Projects on tap for this glorious Saturday are a starter motor removal and replacement on a '90 Jetta with a slush-box transmission and door handle repair on a '94 Saturn SL1.
First up: Starter Motor R and R
Thursday, the white Jetta presented with a no start condition. When the key was turned the click of the solenoid could be heard but the starter failed to engage. I conducted a few tests and made a determination that the starter was kaput. First, I tested the main ground which runs from the negative battery terminal to the transmission. Conducting this test and the other tests to follow requires a multimeter. A suitable and cheap meter can be acquired from a local Radio Shack, Sears or generic auto parts store. I bought my cheap meter six years ago for $20 and it still works fine.
Okay, now that you have a multi-meter you probably feel all cool and tech-savvy. What follows is a narrative regarding the diagnosis and replacement of failed ignition and starter circuit components. It is not a "how-to" or a repair guide by any measure. It is simply a written documentation of my experience. I make no guarantee- implied or otherwise - regarding the trouble-shooting and repair technique detailed below and I am not responsible for any harm that might come to you, your car, your mother-in-law, your pet lama or anyone or thing that may be destroyed or maimed as a result of your own actions. By the way, this is a standing disclaimer that applies to everything written in this blog. That said, read on and enjoy.
So, with cheap meter in hand turn the selector to measure circuit resistance - also known as continuity. The units used to measure resistance are called ohms and they are annotated with this symbol: Ω. (Oh, by the way, resistance is the measurement of how much a conductor hinders the flow of electrons. The higher the reading the more a given material or circuit hinders the flow of electrical current. If the resistance is infinite then there is a break in the circuit.)
To test the ground place one of the meter's leads on the bolt that locks down the battery ground and put the other lead to a bare bit of metal on the engine. The ground is good and so the meter reads zero ohms of resistance. Any other reading on the meter means that there is too much resistance in the circuit. A poor main ground can cause a no start or hard start condition - especially when the temperatures start to drop. Usually a good cleaning of the battery terminals and the contact patch around and beneath the ground bolt on the transmission will remedy this condition. There are some who replace the main ground wire with a heavier gauge, however, I have never found this necessary. Note: to properly clean these contacts the battery terminals have to be detached and the ground bolt has to be removed. A bit of sand paper or a wire brush can be used to scrape away the corrosion that lurks in these trouble spots.
So, that didn't fix the problem. Well, time to move on to the next test. This test will determine if enough power is being delivered to the starter and solenoid. This is a two part test. I'll also need a buddy to help me with part of this test. First part - this is the part that requires the buddy - is to check the voltage being delivered to the solenoid switch.
The solenoid switch rides piggy-back on the starter. The solenoid is essentially a relay that uses a small-current voltage routed via the ignition switch to control a larger-current that is routed to the solenoid directly from the battery. Inside the solenoid is a coil of wire looped around a conductive plunger. When the ignition switch is turned to the 'start' position, voltage surges into the coil creating a magnetic field that draws the plunger into the center of the coil, which completes the circuit between the battery and the starter motor, which causes the engine to turn over and to fire-up, which allows you to drive to the store to buy chocolate ice cream and strawberries for your pregnant wife which, ultimately, keeps the peace in your household. If there is a break in either solenoid or starter circuit the engine will not start and the world will end - well, sort off.
Okay, that said, disconnect the wire that runs from the firewall to the solenoid. It is easy to identify because it is the smaller of the two wires that connect to the starter and it is the only wire attached to the solenoid via a quick-disconnect terminal. Place one lead on the disconnected wire and the other lead to a grounded spot of the chassis. Turn the selector to measure volts. Have your buddy - I used my brother (he wasn't doing anything important at time - well, he was swapping in tinted taillights on his '97 Jetta - at least he wasn't swapping in clear taillights like those Honda boys.) Have your buddy turn the key to the start position. The meter should read 12 volts. According to the Bentley service manual the minimum acceptable reading is 8 volts. Any reading less than this indicates a problem with the ignition switch or the wire that runs between the ignition and the solenoid. Look directly below for a photo of me replacing the wire that runs from the ignition to the solenoid. In the photo, I am crimping a new quick-disconnect terminal. The terminal will then be slipped into the plastic terminal block that plugs into the ignition switch. Always use automotive grade wire of the appropriate gauge. No, that lamp cord in the attic will not suffice.

If no problem can be found here, the next step is to test the power from the battery to the solenoid. This is the larger wire that runs from the positive battery terminal to the bolted-down ring terminal on the solenoid. Conduct this test in the same manner as the last except this test can be done with the key in any position - which is good because your buddy must get back to his taillights. Here again, a reading of 12 volts is ideal but - according to the Bentley service manual - 8 volts is the minimum acceptable reading.
If both these tests yield positive results, then either the starter or the solenoid have given up the ghost. The solenoid can be tested by bridging the two threaded posts with a jumper. The top post is the one that has the bolted-down power wire from the battery and the bottom post has a bolted-down field winding that relays power to the starter motor. - WARNING - Make sure the car is in neutral or Park before conducting this test. You may be my only reader and I can't afford to loose you. The two terminals can be bridged with a piece of 10 gauge wire or - if nothing else is available - the power cable can be loosened from the top terminal and touched to the bottom post. Take care to hold on to the wire insulation or you may get fried. - This is a good point to remind you that I am not responsible for your early demise. If you get yourself killed or maimed it is your own damn fault. Though, I will be a little sad, not because I miss you rather because you'll have left my Blog readerless - If there is a pop and a spark followed by the whir of the starter motor then it can be concluded that the solenoid is shot. If nothing happens or if there is a spark but the starter does not engage, then most likely it is the starter is faulty.
In the old days, people used to either re-build the starter or solenoid on there own or have a local, specialty shop complete the task. These specialty shops are still out there. I can think of two in my area, however, the more common practice is to call a franchise parts place and order a new (read as more expensive yet reliable) or a rebuilt (slightly cheaper but of questionable quality) starter/solenoid assembly. For a VW figure on a price of about $180 for the new one and about $150 for the rebuilt. If you don't have the bread for the whole assembly but you've determined that only the solenoid is dead, then there is a cheaper - albeit - ghetto style fix. Simply purchase a Ford starter solenoid and a small spool of 10 gauge wire and bypass the starter-mounted solenoid altogether. The Ford switch can be salvaged from a pre-86 Ford van or truck at the local auto bone yard or an equivalent can be purchased at any parts store for about $10. One particular model is the Duralast F496 Starter Solenoid. You can figure out the wiring on your own.
Back to my project. Removing and replacing the starter is a fairly straight forward task - unless - like me - you own a Jetta equipped with an automatic transmission. To remove the starter on such a Jetta the passenger-side axle must be removed to gain access to the starter motor. A special tool is required to remove the six bolts that fasten the axle to the transaxle flange. On the other end, a 30mm nut secures the axle to the hub. If you lack pneumatics a rugged breaker bar will do the job. However, do not attempt to break this nut with the car jacked or on stands as the torque required is enough to topple the vehicle from its perch.


To remove the axle the control arm must be released to create the necessary clearance. To do this, the Bentley service manual calls for the control arm to be detached by releasing the ball joint. I have found that it is easier to detach the control arm at the subframe. Doing so will prevent the potential for damaging the ball joint or its boot. At this point, removing the starter is as easy as disconnecting the solenoid's two electrical connections and unbolting the starter's three mounting bolts.
To prevent these problems, the engineers at Volkswagen designed a heat shield to divert heat off the starter and solenoid. The heatshield - which is positioned directly between the starter and manifold - is made from pressed aluminum. Unfortunately, after eighteen winters the heatshield on my Jetta acquired some amoeba-shaped rust holes.

The remedy, of course, is to wrap the starter in a heat-reflecting blanket. Most auto performance retailers stock these fiberglass wraps. Unlike the blanket on your bed, this one is designed to keep the starter cool - not warm - by shedding 90 percent of the ambient heat that would otherwise be absorbed by the starter. After wrapping the starter in the heat-reflecting blanket, all that remains is installation and reassembly - this of course - is the reverse of removal. When you're done, have a beer or six to celebrate.
Next up: door handle repair
Broken door-handle assemblies are a snap to replace on a older Volkswagen because there are only two bolts holding the mechanism to the door. Replacing a broken door-handle assembly on a Saturn is entirely different. Check out the photos below and you'll see that the plastic door skin and mirror must be removed to gain access to the door mechanism.
 First, the handle must be removed. This is accomplished by removing the plastic pins that hold the handle. Press out the center of the two-part pins and then pry the outer piece from its housing. With both pins completely removed, the handle should pop-off when pressed to the left.
Next, remove the mirror. Three bolts secure the mirror to the door. To get to these bolts, a plastic piece of interior trim will have to be pulled back and out of the way. Only one screw holds this triangular piece of trim to back side of the mirror.
With the mirror detached, work from the inside of the door. Using a T30 torx bit, loosen and remove the nine screws that fasten the door skin to the door. With a little finesse, the panel should now come free. Using two sets of needle-nose pliers, disconnect the door-handle linkage and, then, gently pry back the tabs that secure the handle-mechanism to the door frame. Instal the new door handle mechanism. A small hammer may be used to tap the tabs back into position. Otherwise, instalation is the reverse of removal.
 Note the missing spring on the handle assembly above. Look below to see a properly-working example.
You've got to love the Saturn's rust-proof polymer panels. BMW made a polymer-clad roadster back in the early '90s. It was called the z-1 and it was a lot faster than my Saturn, pricier too.


Tuesday, May 13, 2008


Subscribe to:
Posts (Atom)